Ben AI User Guide
Everything you need to know to get started and make the most of Ben AI
Getting Started
Create Your Account
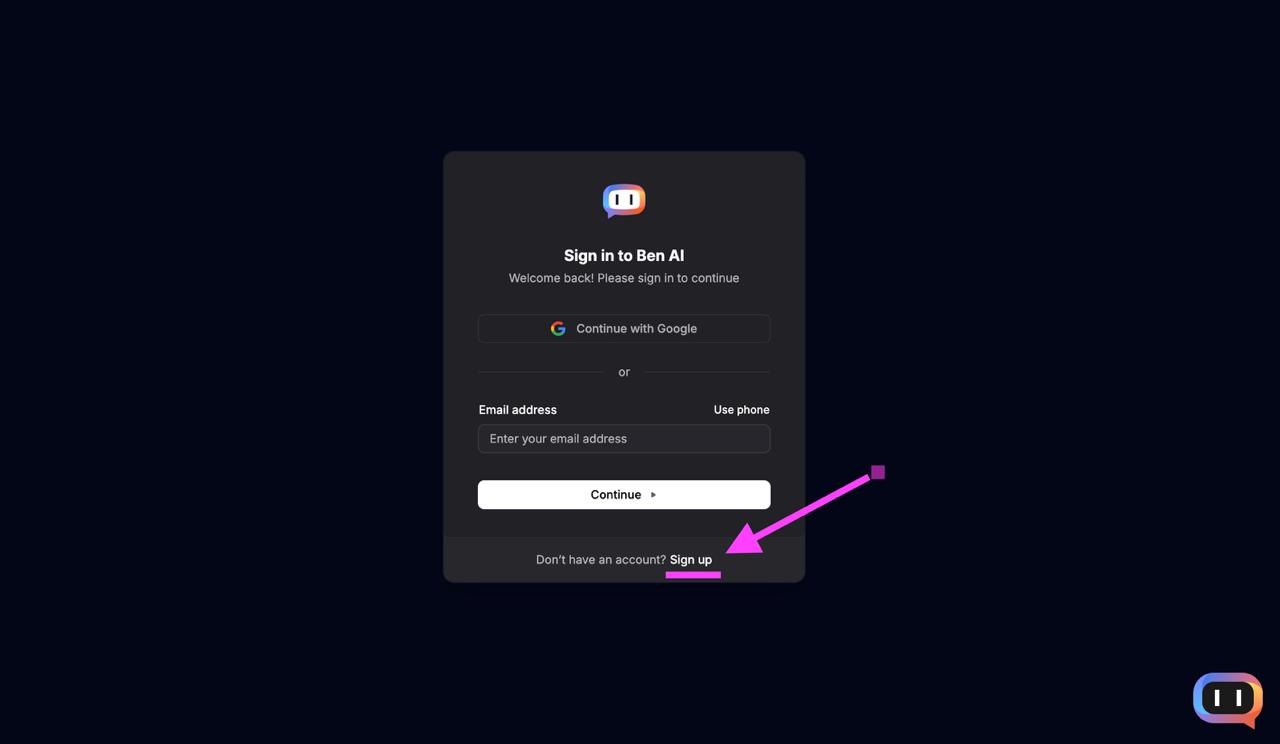
To get started with Ben AI, navigate to ben24.app and click the "Sign up" link at the bottom of the sign-in form.
Complete Registration
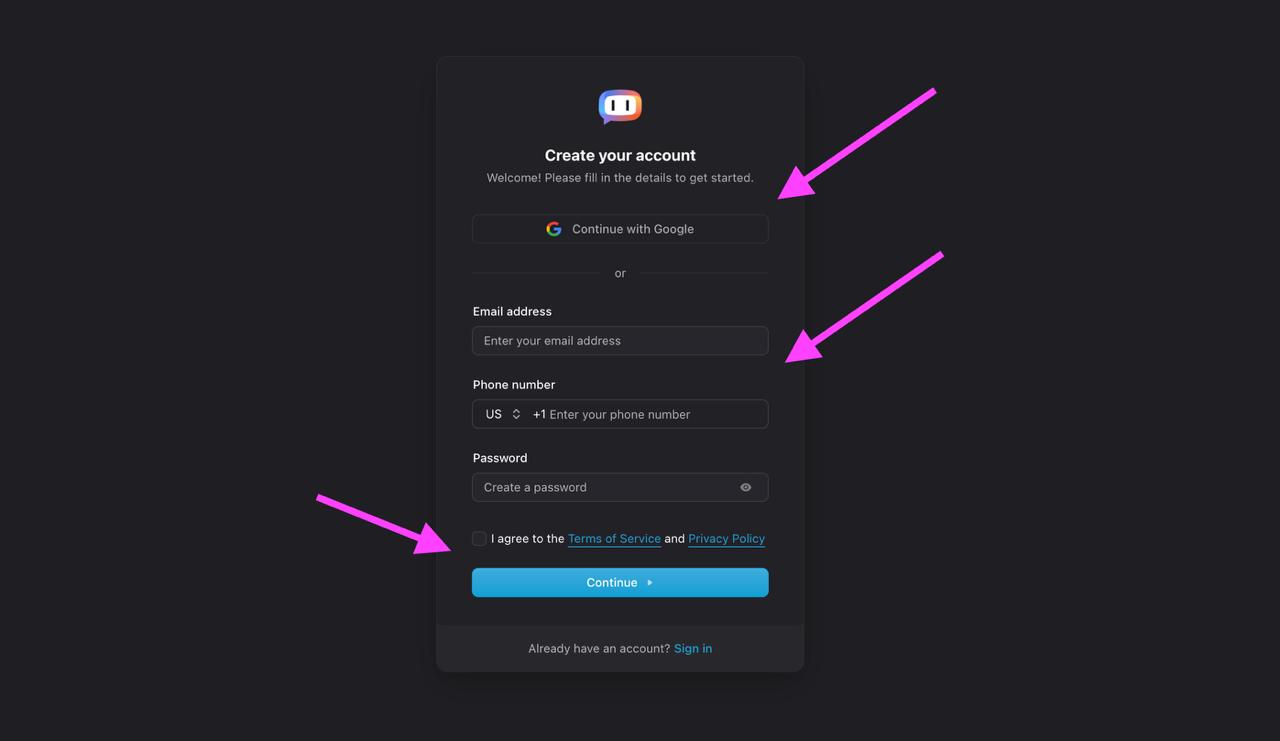
You have two options to create your account:
- Continue with Google — Click the Google button for quick one-click registration using your existing Google account.
- Manual registration — Enter your email address, phone number, and create a password.
Important: A valid phone number is required to receive SMS notifications about new leads. Make sure to enter a phone number where you can receive text messages.
Review and accept the Terms of Service and Privacy Policy, then click "Continue" to complete your registration.
Set Up Billing
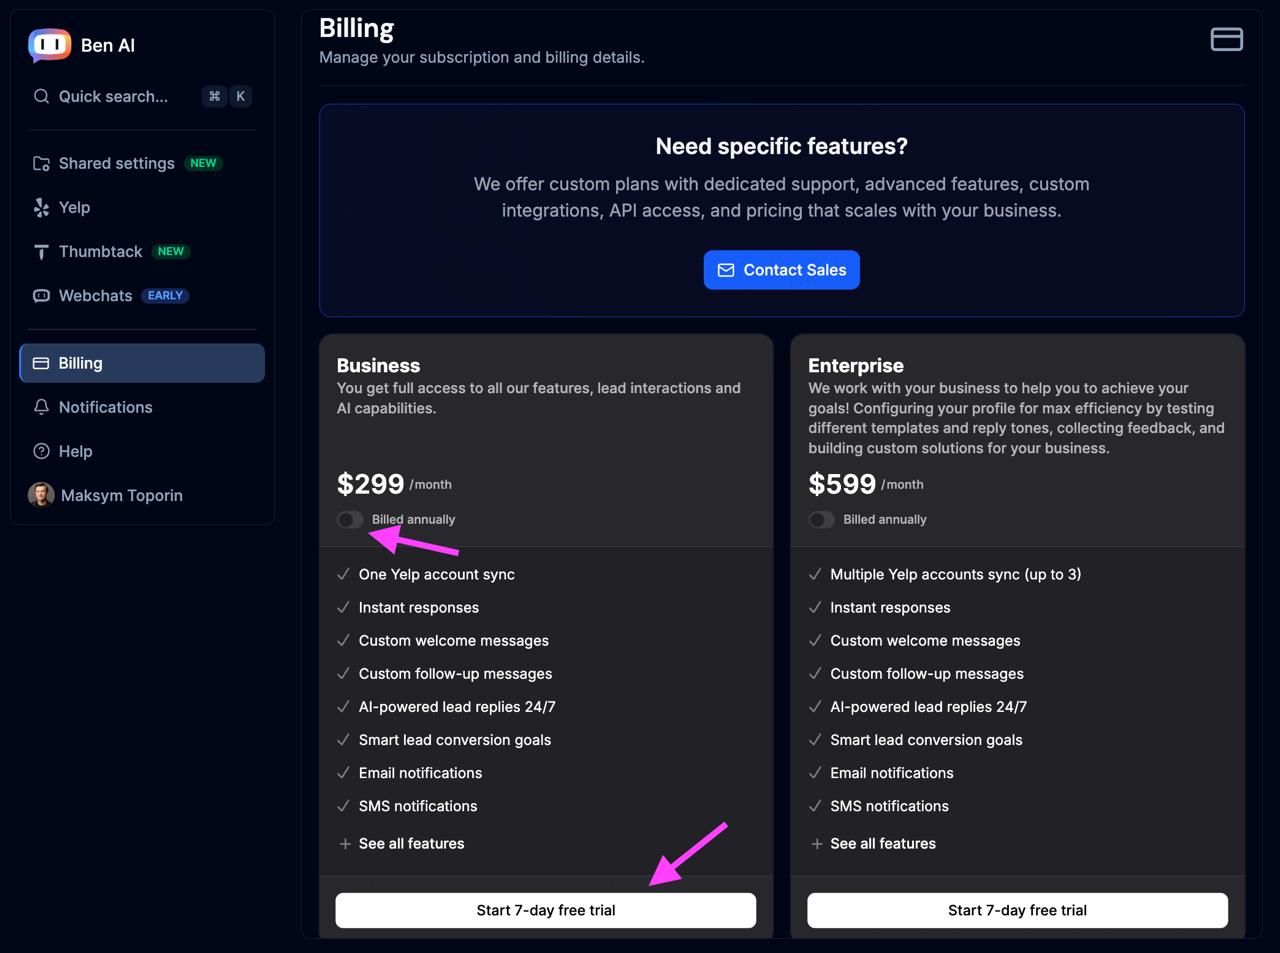
Before connecting your Yelp Business account, you'll need to add your payment information. Navigate to the Billing section in the left sidebar.
Select a plan and click "Start 7-day free trial" to begin. You'll have full access to all features during the trial period, and you won't be charged until the trial ends.
Note: Each subscription covers one Yelp Business account. If you manage multiple Yelp locations, you can add additional accounts later from the Yelp settings page.
Connect Yelp
Start the Integration
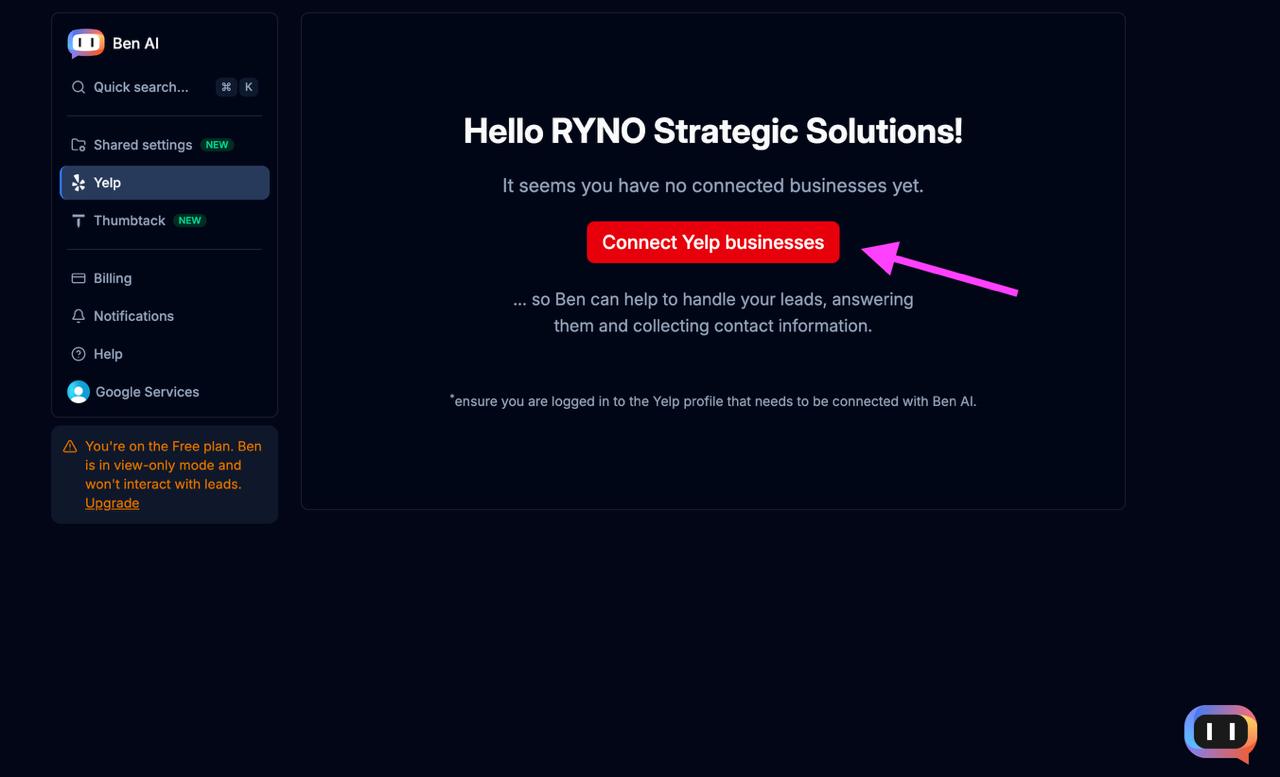
You're just one step away from connecting your Yelp Business account to Ben AI. Navigate to the Yelp section in the left sidebar and click the "Connect Yelp businesses" button.
Once connected, Ben AI will be able to handle your leads automatically — answering inquiries and collecting contact information on your behalf.
Important: Make sure you are logged in to the Yelp profile that you want to connect with Ben AI before proceeding.
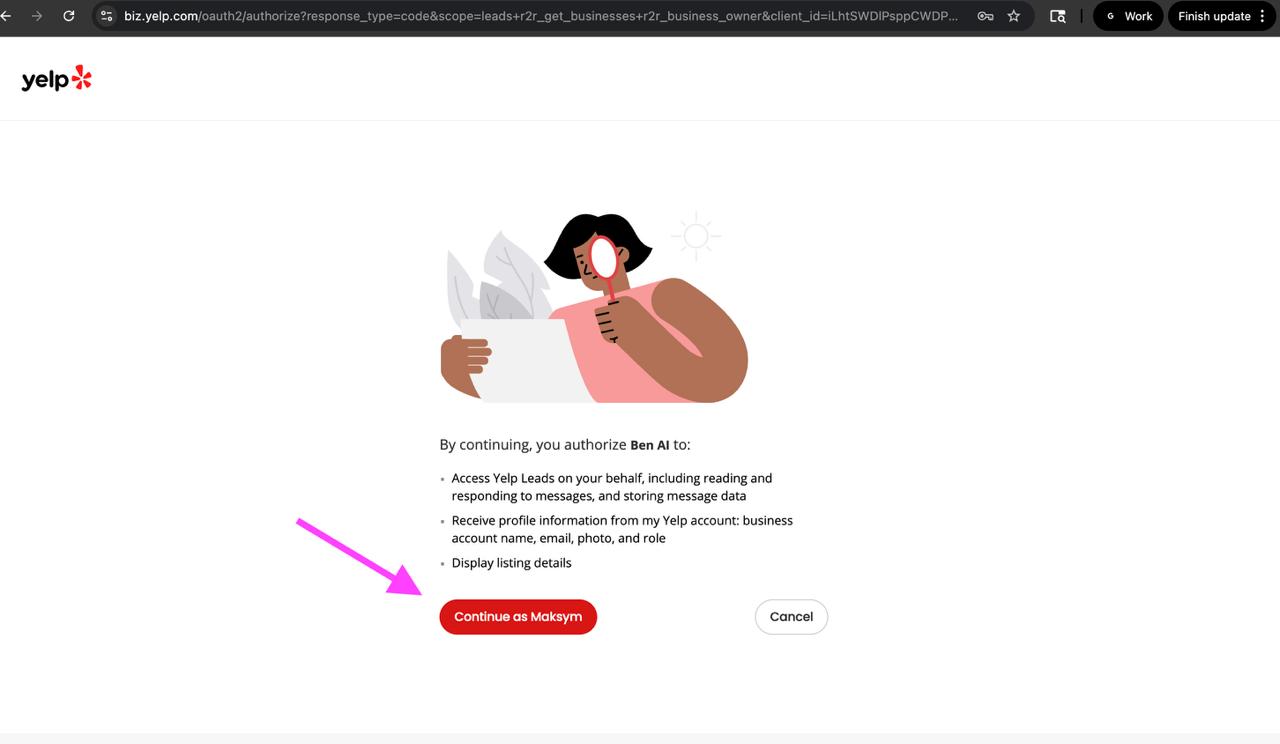
Authorize Ben AI
You will be redirected to the Yelp Business authorization page at biz.yelp.com. This page shows the permissions that Ben AI requires to manage your leads.
Review the permissions and click "Continue" to authorize Ben AI. Once authorized, the integration will be complete and Ben AI will start handling your Yelp leads automatically.
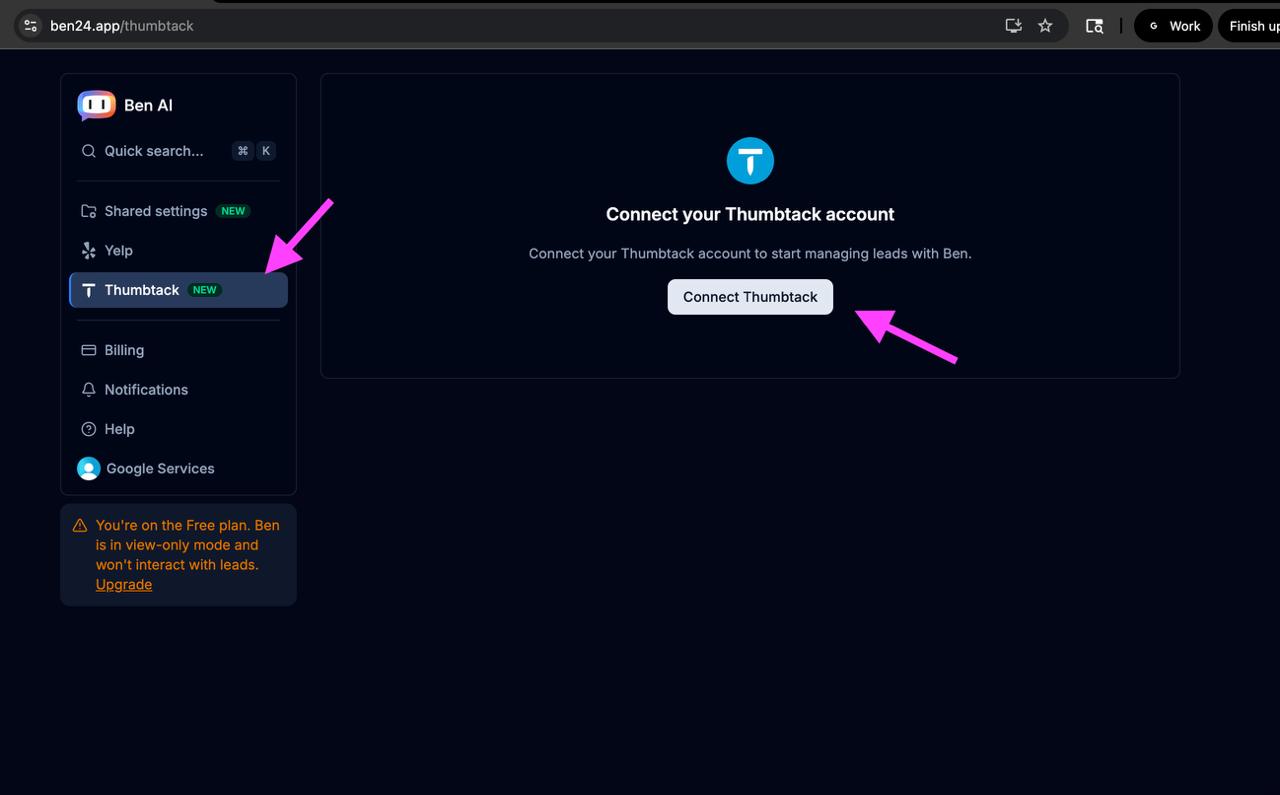
Connect Thumbtack
Connect Your Thumbtack Account
In addition to Yelp, you can also integrate your Thumbtack Pro account with Ben AI. Navigate to the Thumbtack section in the left sidebar and click the "Connect Thumbtack" button.
Once connected, Ben AI will automatically respond to your Thumbtack leads, helping you capture more jobs by responding instantly to potential customers.
Configure AI Replies
Select a Business to Configure
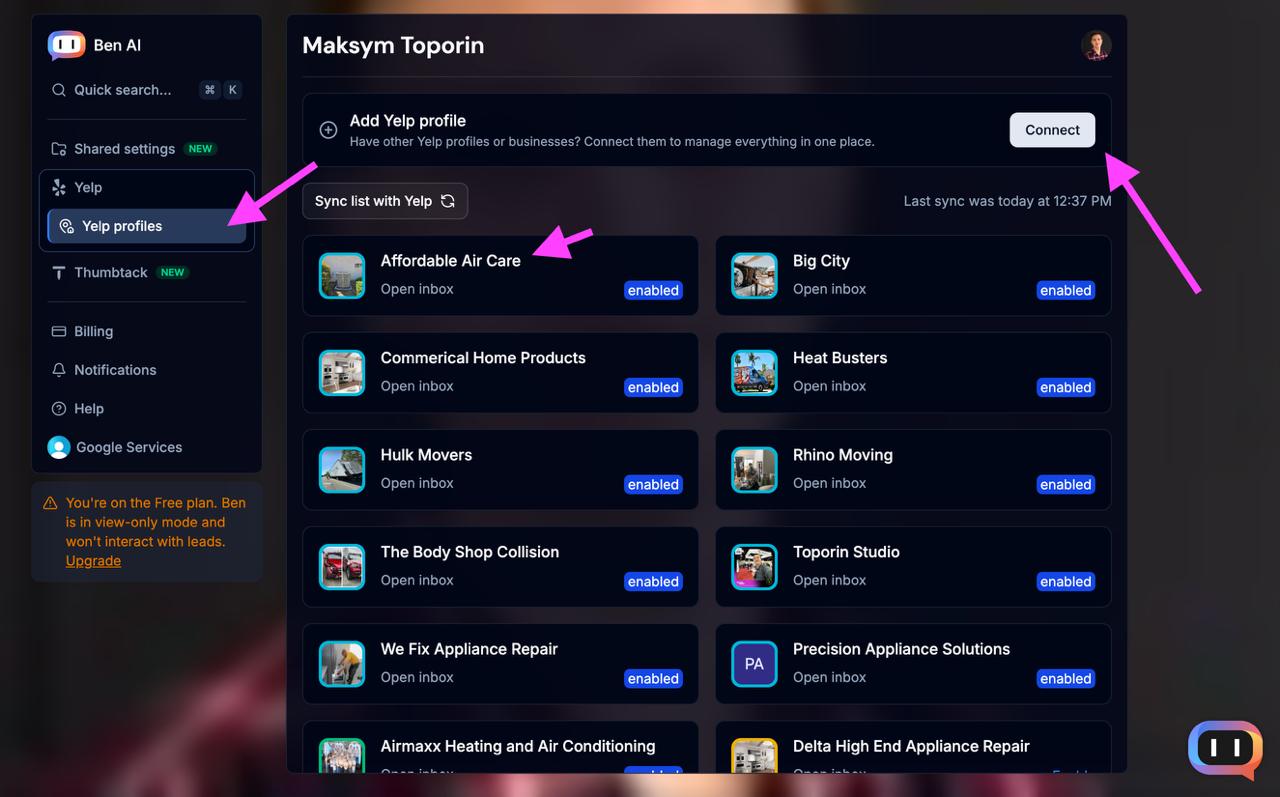
After connecting your Yelp account, you'll see a list of all your synced businesses. Click on the business you want to configure to access its AI reply settings.
You can also add additional Yelp businesses by clicking the "Connect" button at the top of the page. This is useful if you manage a client's Yelp Business account using their direct login credentials rather than through your admin account.
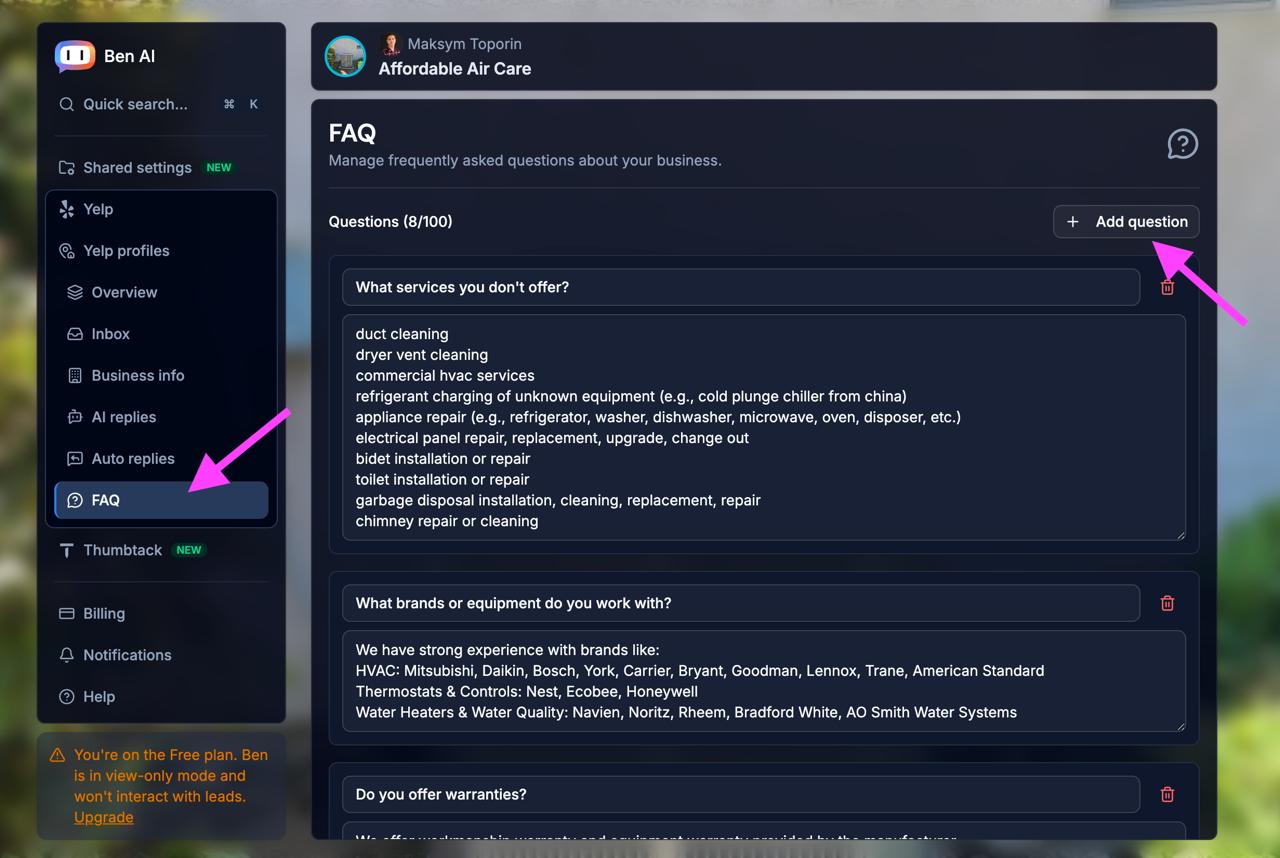
Fill Out Your Business FAQ
The next step is to populate your business FAQ. This information helps Ben AI provide accurate, personalized responses to your leads.
Navigate to the FAQ section in the left sidebar. Here you can add frequently asked questions and answers about your business — services you offer (or don't offer), brands you work with, warranty information, and more.
Click "+ Add question" to create new entries. The more detailed your FAQ, the better Ben AI can represent your business when talking to potential customers.
Create Auto Replies
Navigate to the Auto replies section to set up your automated responses. You have two options for how Ben AI responds to leads:
- AI-generated reply — Enable this toggle to let Ben AI craft intelligent, contextual responses based on your FAQ and business information.
- Custom instant replies & follow-ups — Write your own message templates with placeholders like
{{USER_NAME}}for a more personalized touch.
You can also optionally filter replies by Job categories to create different response branches for different service types. For example, you might want different messaging for HVAC repairs vs. installations.
Use the AI prompt field to add conditions — ask a yes/no question to determine if this specific reply should apply (e.g., "Is this urgent?" or "Is the customer asking about pricing?").

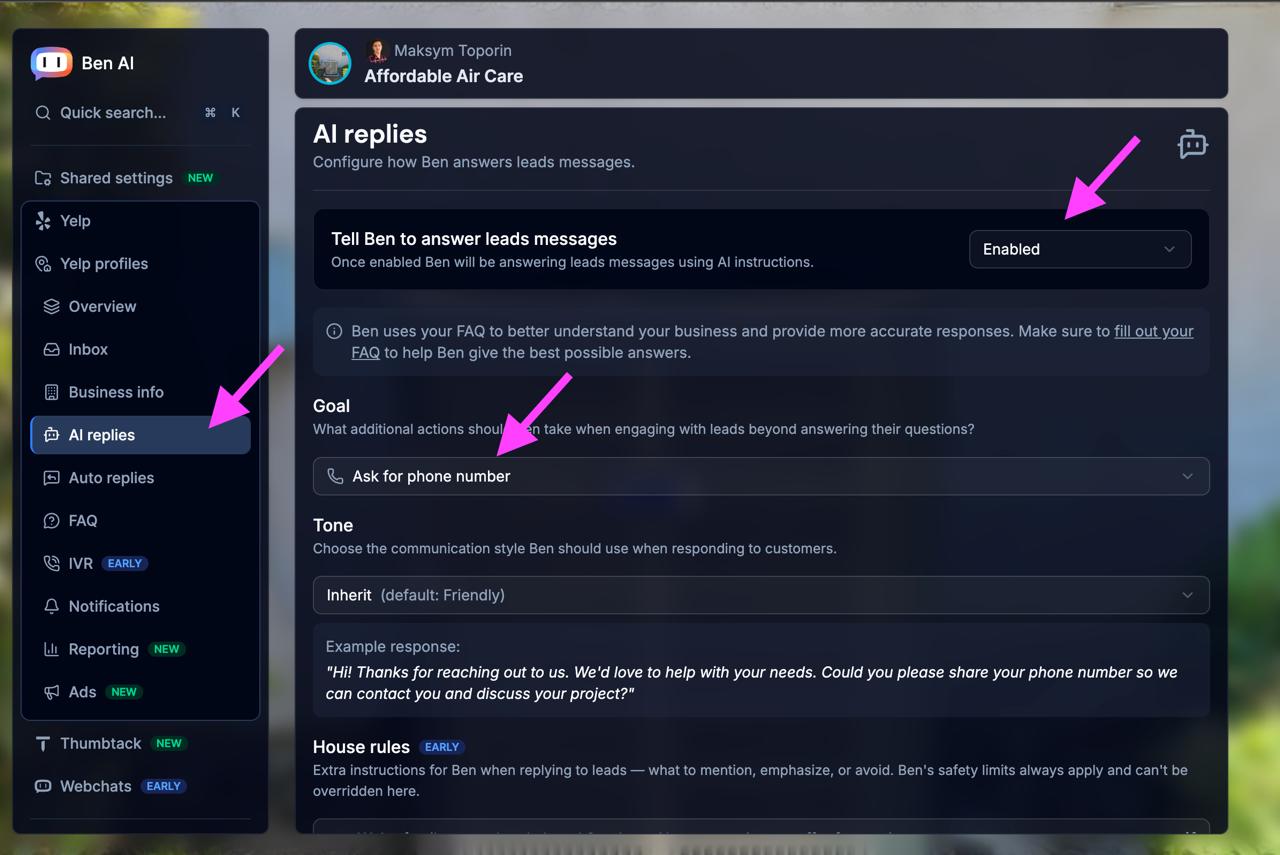
Enable AI Replies
Navigate to the AI replies section in the left sidebar to activate Ben AI for your business.
Switch the "Tell Ben to answer leads messages" toggle to Enabled. Once enabled, Ben will start answering leads messages using AI instructions.
Select a Goal for Ben AI — this determines what additional actions Ben should take when engaging with leads beyond answering their questions. For example, "Ask for phone number" will prompt Ben to collect contact information from potential customers.
You can also customize the Tone of responses and add House rules with extra instructions for Ben.
Important: Don't forget to click "Save Changes" after making any modifications to your AI reply settings!
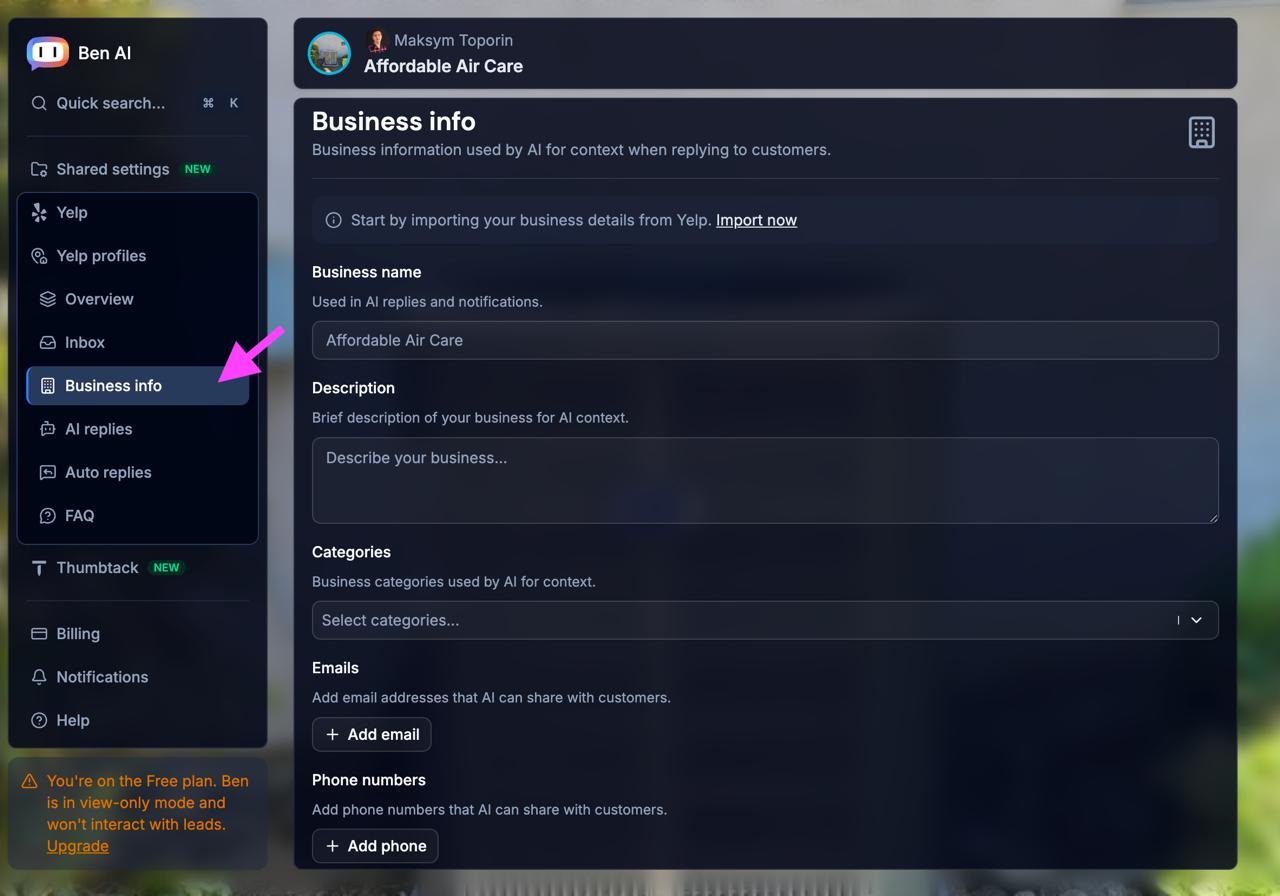
Add Business Information (Optional)
To help Ben AI provide even better responses, you can add additional information about your business. Navigate to the Business info section in the left sidebar.
Here you can fill in:
- Business name — Used in AI replies and notifications
- Description — A brief description of your business for AI context
- Categories — Business categories to help AI understand your services
- Emails & Phone numbers — Contact information that AI can share with customers
You can also quickly import your business details from Yelp by clicking "Import now" at the top of the page.
The more context you provide, the more accurately Ben AI can represent your business when talking to leads.
Webchat Setup
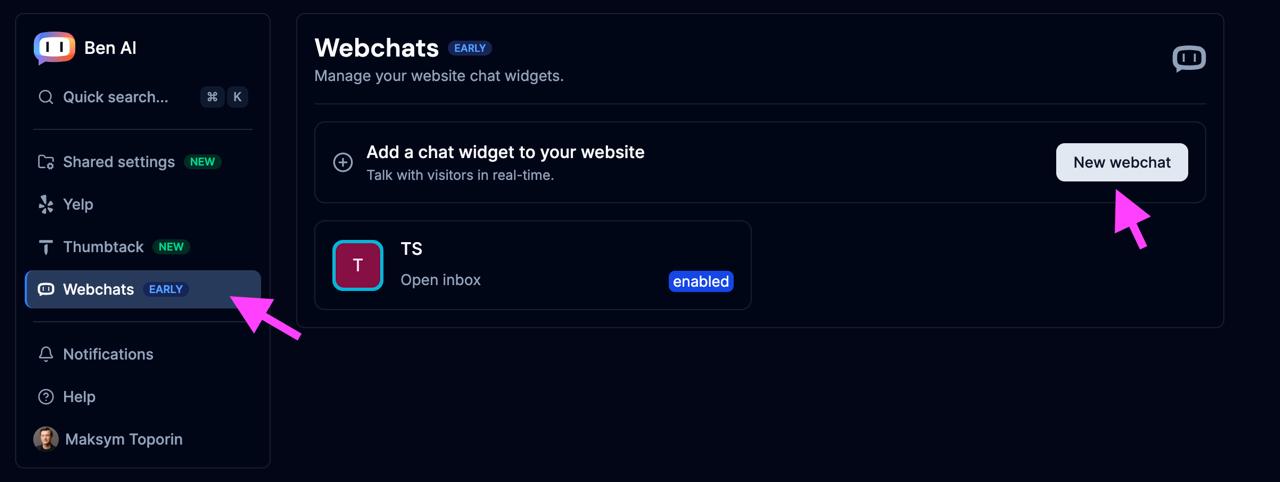
Create a Webchat Widget
Add a chat widget to your website or landing page in just 3 clicks! Navigate to the Webchats section in the left sidebar.
Click "New webchat" to create a new chat widget. Once created, you'll be able to customize its appearance and behavior, then embed it on your site to start talking with visitors in real-time.
Your webchat will use the same AI configuration and FAQ that you've already set up, so Ben AI will be ready to answer questions and capture leads right away.
Configure and Embed Your Webchat
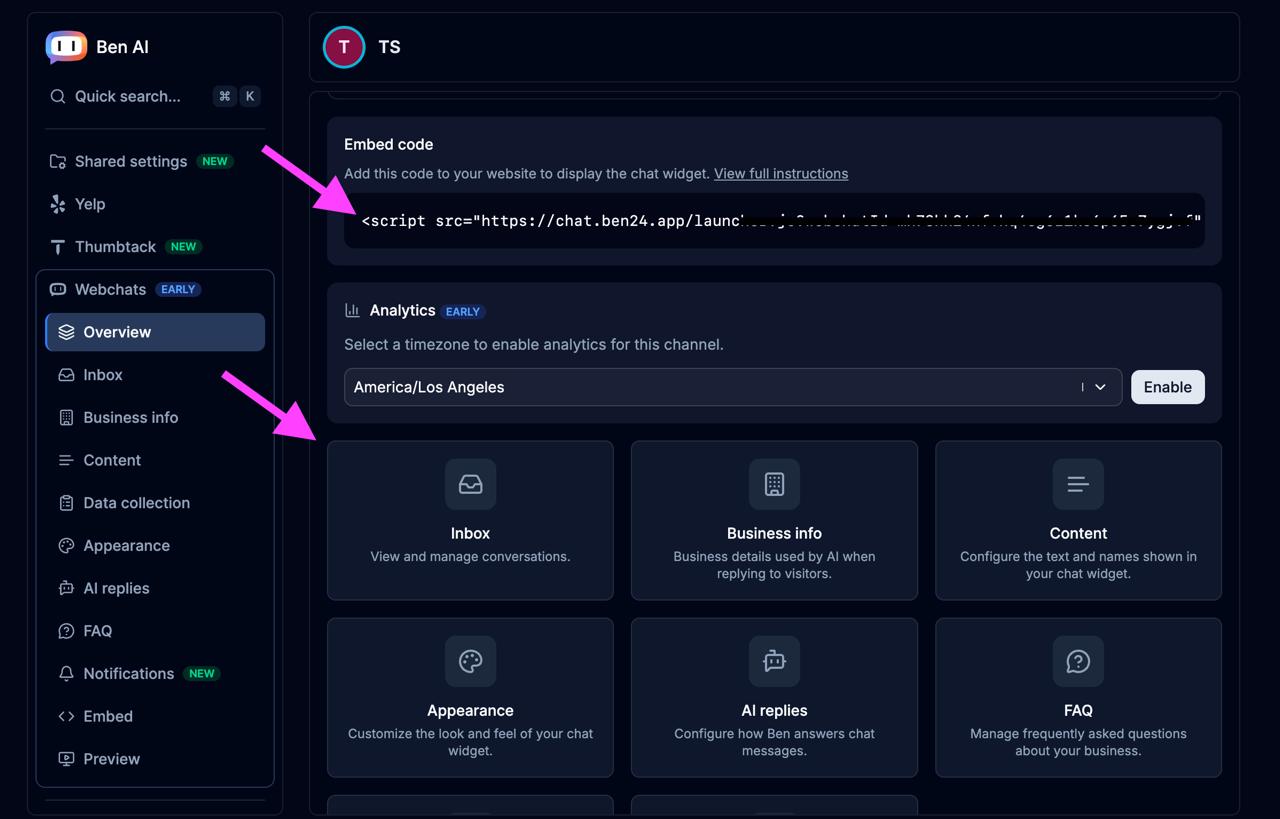
After creating your webchat, you'll need to configure it and add the embed code to your website.
Copy the Embed code script and add it to your website's HTML. This single line of code will display the chat widget on your pages.
Just like with Yelp or Thumbtack, fill out all the necessary information:
- Business info — Business details used by AI when replying to visitors
- Content — Configure the text and names shown in your chat widget
- AI replies — Configure how Ben answers chat messages
- FAQ — Manage frequently asked questions about your business
- Appearance — Customize the look and feel of your chat widget (colors, position, etc.)
Don't forget to enable analytics by selecting your timezone, and activate the chat when you're ready to go live!
Notifications
Configure Your Notifications
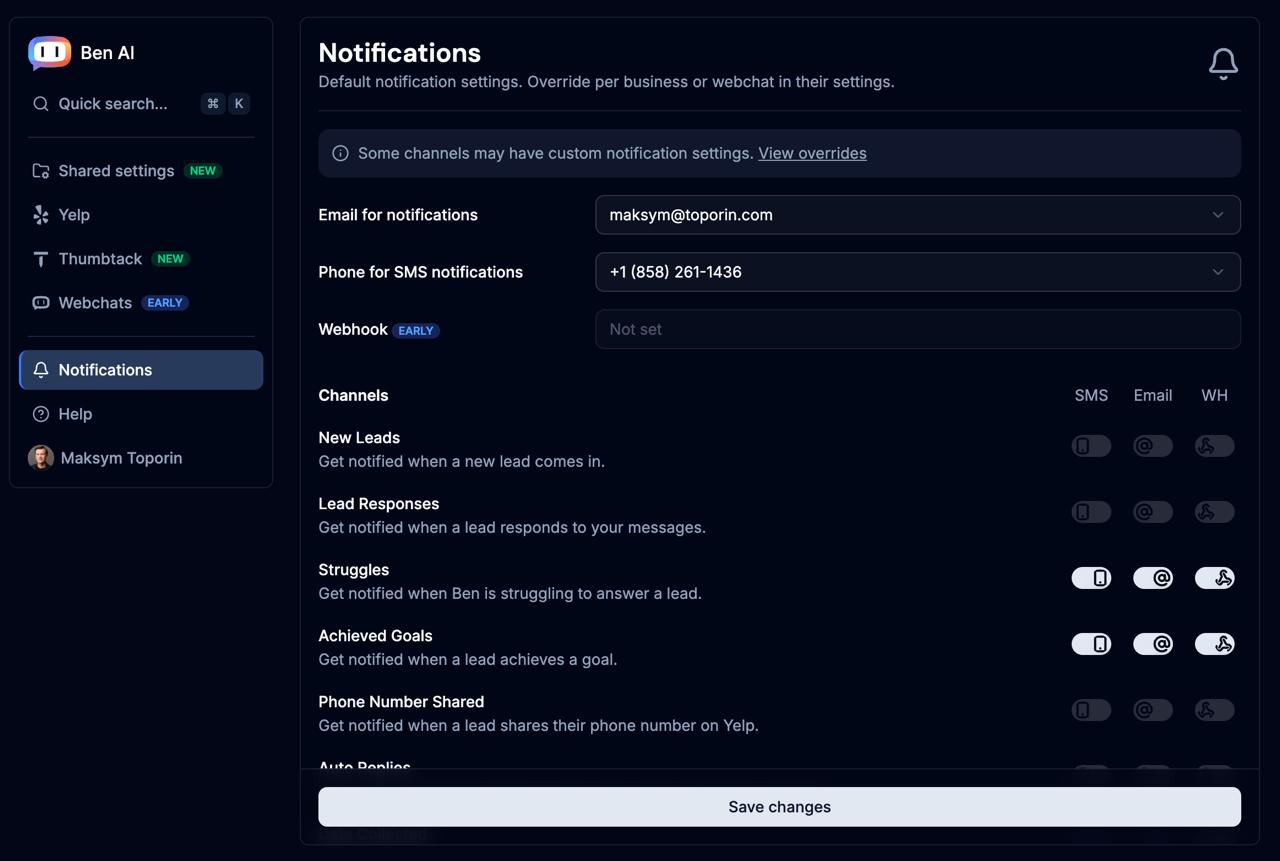
Stay on top of your leads by setting up notifications. Navigate to the Notifications section in the left sidebar.
First, select your preferred contact methods:
- Email for notifications — Choose which email address receives alerts
- Phone for SMS notifications — Select the phone number for text message alerts
- Webhook — Connect a webhook URL to integrate with your own systems or third-party tools
Then choose which events you want to be notified about via SMS, Email, or Webhook:
- New Leads — Get notified when a new lead comes in
- Lead Responses — Get notified when a lead responds to your messages
- Struggles — Get notified when Ben is struggling to answer a lead
- Achieved Goals — Get notified when a lead achieves a goal
- Phone Number Shared — Get notified when a lead shares their phone number
Don't forget to click "Save changes" after configuring your preferences!
Settings
Manage Your Account
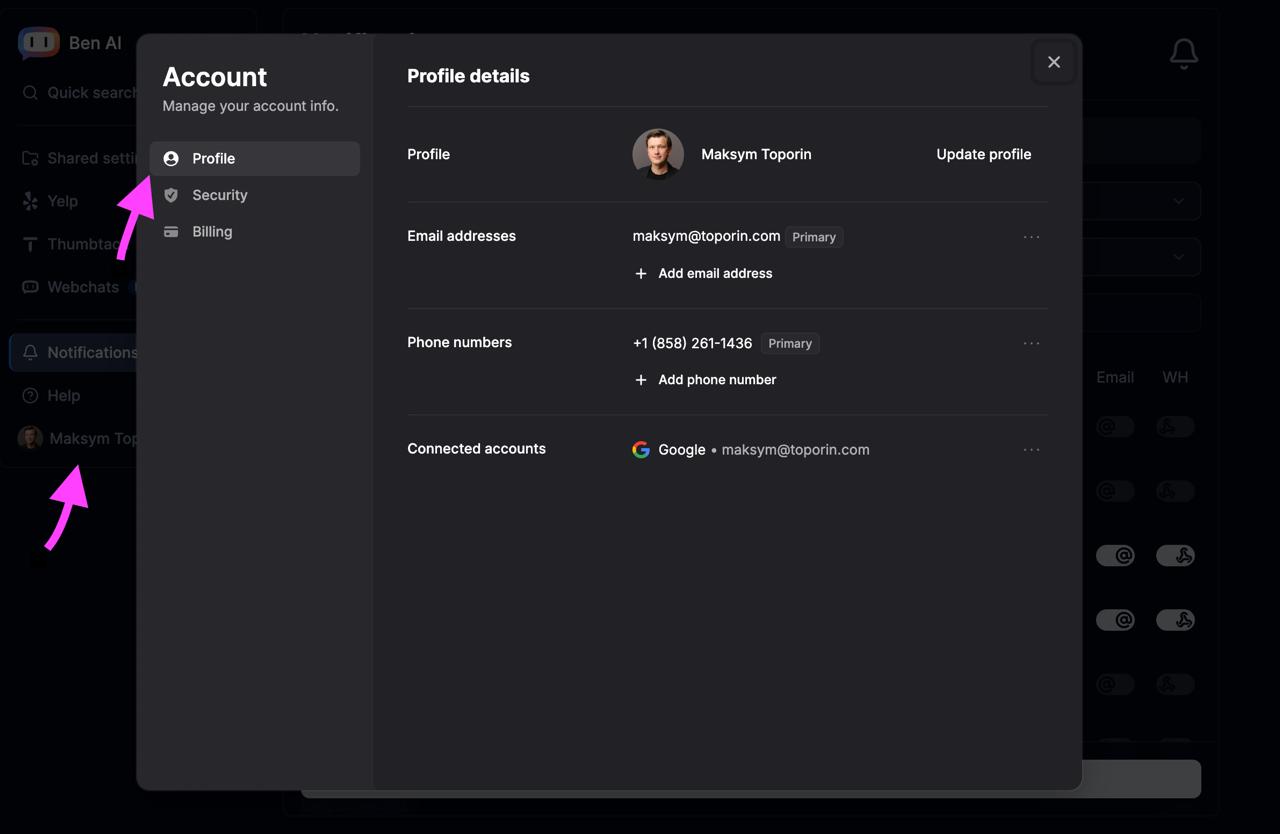
Access your account settings by clicking on your name in the left sidebar. This opens the Account settings modal where you can manage all your personal information.
The Account settings are organized into three sections:
- Profile — Update your profile picture, name, email addresses, phone numbers, and manage connected accounts (like Google sign-in)
- Security — Review your security settings and manage access to your account
- Billing — View your subscription plan, update payment methods, and manage billing information
You can add multiple email addresses and phone numbers to your account, with one marked as Primary for each.